

Workflow Studio is a platform used to create fast and compliant onboarding flows. Build the flow that fits your requirements thanks to our no-code platform, embed it into your application, and onboard all your end-clients seamlessly—Workflow Studio takes care of the rest.
1. Set Up a Workflow Form
If your Workflow is not yet set up by your Implementation Specialist, you can create one yourself with ease through the Trulioo Portal. Once inside of Workflow Studio, the "Show Me How" guide on the right will provide a quick and easy tutorial for creating your first Workflow.
-
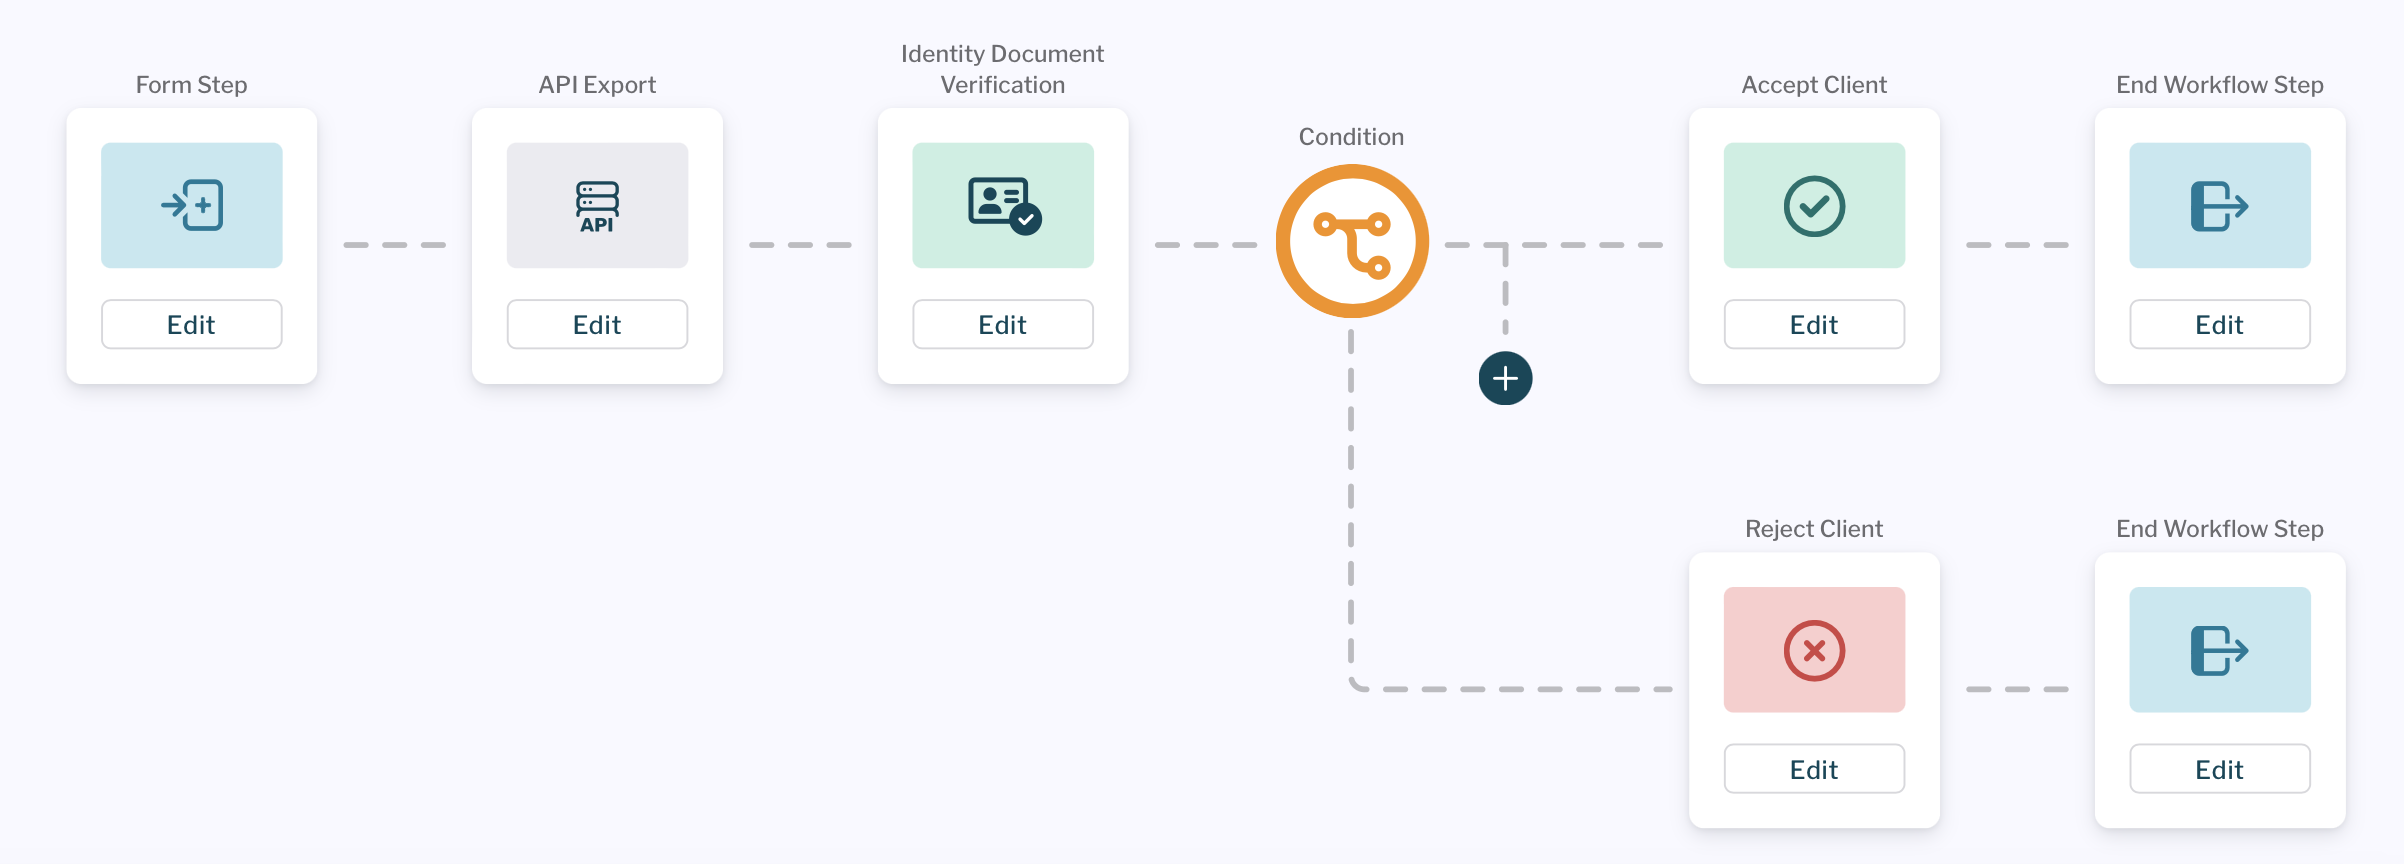
Form Step: Allows users to input information about themselves, whose validity is checked against our datasources. You can set up your flow so that the information will also be crosschecked with data in later steps, such as the Identity Document Verification Step.
-
API Export Step: To create a Workflow Studio API Export Step, click the + button next to your Form Step. New options will appear in the toolbar near the top of the page, alongside "Edit Workflow", your Workflow name, and the "Test Workflow" button. Click on "Export", and then "API Export". This Step will enable your Workflow to receive Webhook events. You can view more details in the Webhook section below.
-
Identity Document Verification Step: Adding an Identity Document Verification Step is simple. Add a new Step as before, and a modal will appear. Clicking on "Identity Document Verification" will add this Step to your Workflow. You can customize it by clicking "Edit" once it appears in your Workflow.
-
Condition, Accept and Reject Steps: These three steps allow you to customize the verification rules that result your user being Accepted or Rejected. It can be as fine-grained as checking individual fields, or as high-level as just checking the overall result of one of the previous Steps.
-
End Workflow Step: When a user reaches this Step, the transaction is marked as completed.
2. Set Up Webhook
Subscribing to Webhook events allows you to keep track of when your users complete each individual step, which may be useful data in reducing friction for your users. Most importantly, you can receive a Webhook event when the user has completed the flow and have a verification result, allowing them to complete the onboarding process.
The Webhook subscription accepts a single URL hosted by you, and will send JSON payloads based on the event that occurred. Each event will result in one call to your endpoint.
The Workflow Webhook API is not the same as the DocV Customer Webhook API.
In order to subscribe to Webhook events, you will need to edit the Export API Step of your Workflow, and then enable events.
Verification Handshake
You will be asked to enter an endpoint hosted on your server that can receive Webhook events. In order to authenticate for the first time, your Webhook endpoint will need to complete a verification handshake. As soon as you enter your URL and press the "Change" button, your endpoint will be called and given a JSON payload with the following:
{
  "token": "string",
  "challenge": "string",
  "type": "url_verification"
}
You endpoint must return the value of the challenge given in the body of this call and a status 200 OK.
After this handshake is complete, your endpoint is ready to start receiving events!
Webhook Events
The events that your registered endpoint receives will have the following format in JSON:
{
  "date": "YYYY-MM-DDTHH:MM:SS.HHMMSSZ",
  "event": "EVENT_NAME", // See below
  "serviceType": "string",
  "workspaceId": "string",
  "flowId": "string",
  "nodeId": "string",
  "endClientId": "string",
  "test": "boolean"
  }
The possible events you can receive are:
- FLOW_START: Triggered when the user loads the Workflow.
- FLOW_END: Triggered when the user reaches the end of any branch of the Workflow.
- STEP_INIT: Triggered when a Form Step loads.
- STEP_SUBMIT: Triggered when a user completes (i.e. clicks the "Continue" button) on a Form Step.
- DOCV_CREATE: Triggered when the user scans the QR code in the DocV Step.
- DOCV_SUBMIT: Triggered when the user submits their images.
- SERVICE_SUBMIT: Triggered when an Accept/Reject Step has been executed.
You can find out more about what type of events to expect by visiting the Workflow Studio Guide to Webkhooks.
3. Add Your Workflow Form to Your Website
There are two main ways of integrating the Workflow form on your website: either by linking to it directly or by embedding it.
When you launch your workflow, you are presented with many options on how to integrate your new Workflow Form onto your website. The simplest is by providing a link to your workflow.
You can also choose to embed your Workflow in a multitude of ways. Simply copy the JavaScript to an HTML file, and then you should be able to view your form.
Note that this means that, if you have a ReactJS application, you will want to edit the index.html rather than adding it to a file with ReactJS.
4. Accessing Verification Results
The simplest way to get detailed information on your users' transactions are through Workflow Studio's Client Manager. There, you can look at transactions that are still in progress, manually approve transactions that have completed, and much more.
Each Webhook event will provide a unique userId (also known as x-hf-session) for your user per transaction, which you can use to retrieve more information about your user's transaction. See the Workflow Studio API guide for more information.