

Getting Started (API Version 2.5)
This is a quickstart guide on how to work with our API.
Steps to take
Note: Make sure you add Accept-Version as a header parameter for your requests, and to enter 2.5 as its value.
1. Authorize
Connect to the /authorize endpoint by passing in a license in the authorization header of your HTTP request. This access token will be used in the authorization header of your requests in subsequent steps.
You will receive the access token in the form of a string in the API's response. Once an access token is used for a transaction, it will no longer be usable. You will need to use a new access token (with the authorize call) to create another one.
Dealing with access token expiry (click to expand)
Access tokens expire in one hour. If for some reason you require more time, you can call the refresh endpoint to generate a new one for the same transaction. Alongside the access token, the authorize endpoint will have also returned a refresh token in the body of its response, which you will need for the refresh endpoint. Check out the Additional Information section to learn more.
2. Create a transaction
Create a transaction using the /customer/transactions endpoint. Once the transaction is created, the API will return a transactionId associated with the transaction.
In the body of your request, you will need to specify the kinds of transactions you want to accept from end users. For example, you can specify if you would only like to only process passports and drivers licenses from certain countries. Check out a sample body request Check out a sample body request here.
3. Fetch the shortCode
Finally, you can request a shortCode using the /customer/handoff endpoint, which you will need to launch your SDK. The shortCode lasts up to 5 minutes.
The shortCode is required in the following SDK integration steps:
- Web: Step 3: Start a verification Flow
- Android: Step 4: Start a verification Flow
- Web: Step 5: Initialize the Trulioo SDK
4. Let your SDK do the work!
If you have integrated with one of our SDKs, it will automatically upload the images submitted through the SDK.
For more information about our SDKs, check out the following documentation:
Once your transaction is processed, you are done! You can now use the API to:
- Get data from the transaction (see 5. Retrieve the data )
- Get an image from the transaction (see 6. Retrieve images )
5. Retrieve data
Retrieve the data of a transaction with the /customer/transactions/{transactionId} endpoint. You will need to pass in the transactionId of your transaction as a path parameter. The API will return the transaction corresponding to the ID inputted in a JSON format. See a sample retrieve data response here..
6. Retrieve images
You can fetch the image in two ways:
-
The endpoint from Step 5 will return the URLs pre-constructed with all of the parameters you need, so you simply need to download or display the images at those URLs.
-
Retrieve an image from a transaction with the /customer/transactions/{transactionId}/images/{imageId} endpoint. You will need to pass in the
transactionIdof the transaction, animageIdof an image belonging to the transaction, and an image access token as path parameters. The API will return the image requested in Base64 Format. See a sample retrieve images response here..
Note: The image access token is different from the
accessTokenfrom Step 1. It is included in theimagesobject of the response to Step 4.
Flow Visualization
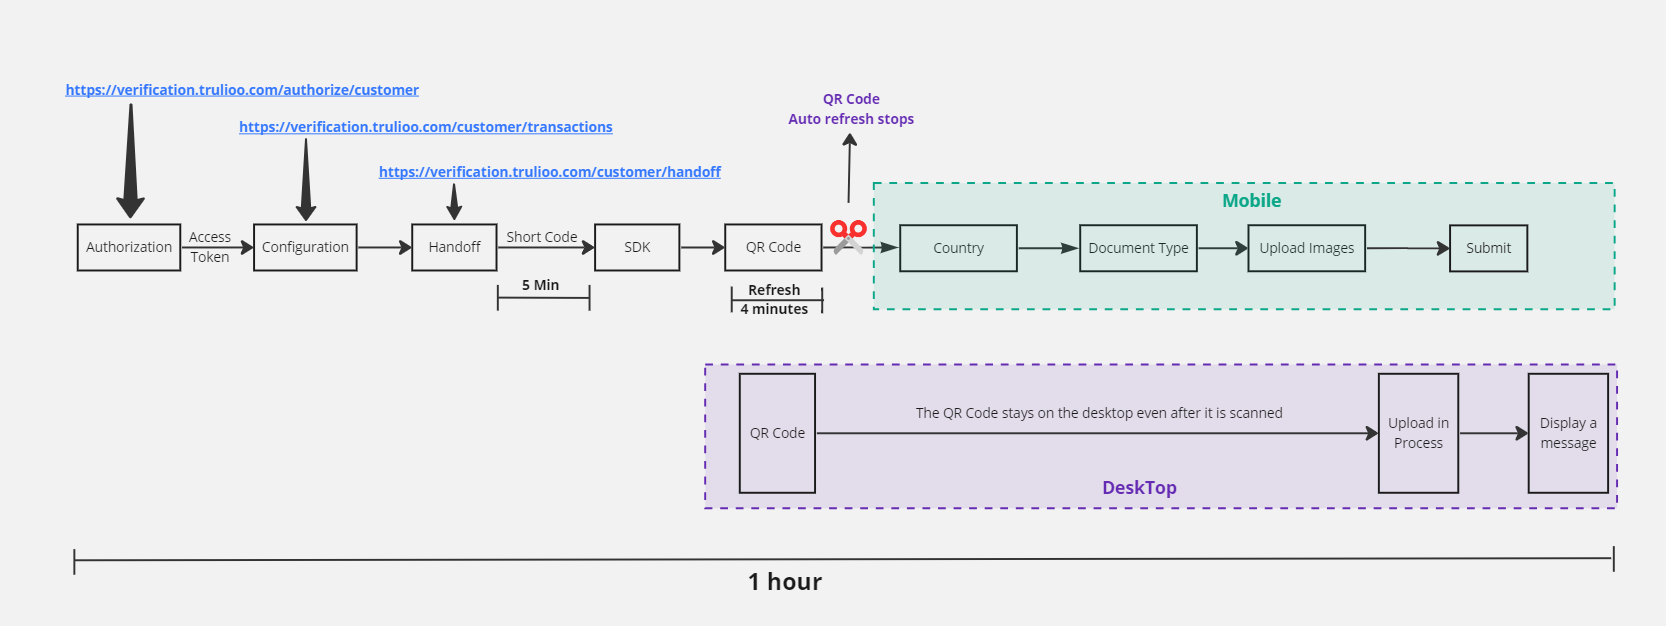
The image above shows the full Document Verification flow from start to finish.
- The flow begins from the left with Authorization (Step 1).
- The Configuration (Step 2) node requires an access token from the previous node.
- Calling Handoff (Step 3) will result in a shortCode, which lasts 5 minutes and is required to launch the SDK.
- If a user starts onboarding from a desktop computer, they will be redirected with a QR Code. Each QR Code lasts 4 minutes, but will automatically renew when it is expired.
- Once the user QR Code is scanned, the user will resume the flow on their mobile device. It will prompt for a Country, then a Document Type (e.g. Passport, Driver's License, etc.), then images (e.g. front of document, selfie), and then ask the user to submit. They will have a total of 40 minutes to finish the flow.
- When the user is going through the flow on their mobile device, the desktop webpage will update based on user's current step on their mobile device. The status of each image upload is shared in real time as the user goes through the experience.
- If this flow is not completed within an hour of Authorization (Step 1), it will be considered to be aborted by the user.
Additional Information
- Refresh your access token with the /authorize/refresh endpoint can be used to refresh the access token once it has expired. You will need to enter the
clientIdas part of the request body to access it. The API will return an access token if the call is successful. Check a sample transaction response here. . - Once the refresh token expires you will need to repeat step one to fetch a new pair of tokens.
- If the verification process takes a significantly long time, contact [email protected] for assistance.